 Sign in to Mod The Sims
- Site Map >
- Modding and Creation >
- Sims 3 Creation >
- Meshing >
- Milkshape 3D - Why isn't my mesh working?
- Site Map >
- Modding and Creation >
- Sims 3 Creation >
- Meshing >
- Milkshape 3D - Why isn't my mesh working?
Replies: 21 (Who?), Viewed: 403 times.
#1
 27th Nov 2023 at 2:54 PM
27th Nov 2023 at 2:54 PM
Posts: 45
Why isn't my mesh working?
here are the group 0 and group 1 mesh files btw. https://www.mediafire.com/file/n60v...roup_1.rar/file The .wrk file is uploaded belowhttps://cdn.discordapp.com/attachme...c5ded5638d79b1&
Attached files:
| its_supposed_to_be_a_hood.rar (618.0 KB, 5 downloads) |
Advertisement
#2
27th Nov 2023 at 4:15 PM
27th Nov 2023 at 4:15 PM
Posts: 865
Quote: Originally posted by Karuttiae
|
here are the group 0 and group 1 mesh files btw. https://www.mediafire.com/file/n60v...roup_1.rar/file The .wrk file is uploaded below |
You have no hair textures, and your work file blows up my TSRW when I try to look at the hat textures. That the file is 36,000kb tells me your textures may be huge, which is totally unnecessary. 4096 x 4096??? Normal files might be 10,000 or less.
I did manage to convert your .wsos to object and take a look in Blender. Your UV is not aligned with the map. Poly count is fine for hair.
Since I can't dig thru your work file, hopefully @CardinalSims will be able to look at it. Meanwhile, textures only need to be 1024 x 1024, dxt5. Dxt1 for specular. Take your mesh back to Blender and algn the UV with your texture, and see how that goes.
Shiny, happy people make me puke!
#3
27th Nov 2023 at 9:27 PM
Last edited by Karuttiae : 27th Nov 2023 at 9:50 PM.
Reason: adding on to the post for clarification
27th Nov 2023 at 9:27 PM
Last edited by Karuttiae : 27th Nov 2023 at 9:50 PM.
Reason: adding on to the post for clarification
Posts: 45
thank you for replying!
LOL! Honestly i dont know what happened for it to be 4096 x 4096, i made it 2048x2048 i swear! (because i heard from a tutorial that its a higher resolution texture (my computer can handle it)) but yeah i have no idea what happened (i'm very much a beginner, this is my first ever cc made in marvelous designer)
oh and yeah, this is sort of a headdress thats not supposed to have hair, that's the problem, i have no idea how to do that. Its supposed to be in the category of hat hairs. I made the mesh, it's a medieval headdress called liripipe
i based it off to have bones/verticles/whatever like this one, again, i tried mesh toolkit and nothing
https://nisuki.tumblr.com/post/1621...beautifuls-this
LOL! Honestly i dont know what happened for it to be 4096 x 4096, i made it 2048x2048 i swear! (because i heard from a tutorial that its a higher resolution texture (my computer can handle it)) but yeah i have no idea what happened
 (i'm very much a beginner, this is my first ever cc made in marvelous designer)
oh and yeah, this is sort of a headdress thats not supposed to have hair, that's the problem, i have no idea how to do that. Its supposed to be in the category of hat hairs. I made the mesh, it's a medieval headdress called liripipe
i based it off to have bones/verticles/whatever like this one, again, i tried mesh toolkit and nothing

https://nisuki.tumblr.com/post/1621...beautifuls-this
#4
27th Nov 2023 at 10:05 PM
27th Nov 2023 at 10:05 PM
Posts: 865
Quote: Originally posted by Karuttiae
|
thank you for replying! LOL! Honestly i dont know what happened for it to be 4096 x 4096, i made it 2048x2048 i swear! (because i heard from a tutorial that its a higher resolution texture (my computer can handle it)) but yeah i have no idea what happened oh and yeah, this is sort of a headdress thats not supposed to have hair, that's the problem, i have no idea how to do that. Its supposed to be in the category of hat hairs. I made the mesh, it's a medieval headdress called liripipe i based it off to have bones/verticles/whatever like this one, again, i tried mesh toolkit and nothing https://nisuki.tumblr.com/post/1621...beautifuls-this |
Some tutorials can be ignored for the most part... especially if you are not already familiar with basics.
 I was guessing 4096 because of the size of the file. I was not able to keep the work open to look, BUT... 2048 is generally overkill also. Did you compress textures on export from your imaging program?
 Anyway, I did a little quickie, moved the UV and made a simple multiplier, mask and specular, just to see. The headdress sank into the head a bit, so either bone or placement adjustment... or a little of both. The hood will need morphs. Can be tricky because of the head part. But over all, it was clean.
Shiny, happy people make me puke!
#5
27th Nov 2023 at 10:28 PM
27th Nov 2023 at 10:28 PM
Posts: 45
Oh my gosh, i've been trying to make it work for (not kidding) 3 straight days. This is the first time seeing the mesh work! :D
I didn't compress my textures... how do i do that? (i use gimp/ clip studio art)
How do i fix the headdress sinking? It looks fine in marvelous designer (the avatar is the same as sims' 3)
And i didn't assign any bones(along with morph), i also dunno how to do that, i tried using mesh toolkit (auto tools for WSO) by selecting the 0 / 1 group and referencing it with the group 0 / 1 of the hijab cc, i tried with a preg morph as the reference...yeah
again, im very very much a beginner.. and using tutorials from 6 years that don't really explain anything don't help
Heres the UVs/multipliers i made:
https://www.mediafire.com/file/h6ji...iplier.rar/file
And here is the preg morph and the hijab cc's groups i used just in case:
https://www.mediafire.com/file/ljd1..._morph.rar/file
#6
27th Nov 2023 at 11:06 PM
27th Nov 2023 at 11:06 PM
Posts: 484
Thanks: 10 in 2 Posts
Hat-hairs are the trickiest, I wish I had a tutorial up on my method, but it still has a bunch of quirks to iron out.
I can see from exporting your project to package that at least two textures are broken (throwing a S3PE error), and many more are missing. There are a couple of EA hairs that don't have a real hair part- the World Adventures hair wrap, the riding helmet, the costume masks, etc. I'd recommend cloning whichever one of those you have access to in S3OC and importing it into TSRW, then the small placeholder textures will already be set up for each group and you can ignore them rather than removing anything
You can still reference some parts of my existing tutorials to get familiar working with meshes, it's just the assembly itself and some of the file formats that will vary when you're using TSRW:
[Blender Setup + Tips] [Hair Creation] [Manual Morphs and LODs]
... I will also stop slacking on the texturing tutorial and post that soon, which will have all of the information about formats and image sizes and such.
I can see that these meshes do have bone assignments, but there seem to be some unnecessary ones probably from the shape of the CC hood being different to yours.
Maybe consider copying bones from an EA hair instead, such as afHairLongStraightSidepart? You can also do manual assignments in Blender, or at least delete the mismatched ones (the top piece has bones for Spine and Neck, for example, which will be pulling it down).
If I remember correctly, when working with .wso you will need to use a reference that already has all morphs. It may be cleaner to use the EA hair for this as well.
I can see from exporting your project to package that at least two textures are broken (throwing a S3PE error), and many more are missing. There are a couple of EA hairs that don't have a real hair part- the World Adventures hair wrap, the riding helmet, the costume masks, etc. I'd recommend cloning whichever one of those you have access to in S3OC and importing it into TSRW, then the small placeholder textures will already be set up for each group and you can ignore them rather than removing anything

You can still reference some parts of my existing tutorials to get familiar working with meshes, it's just the assembly itself and some of the file formats that will vary when you're using TSRW:
[Blender Setup + Tips] [Hair Creation] [Manual Morphs and LODs]
... I will also stop slacking on the texturing tutorial and post that soon, which will have all of the information about formats and image sizes and such.
I can see that these meshes do have bone assignments, but there seem to be some unnecessary ones probably from the shape of the CC hood being different to yours.
Maybe consider copying bones from an EA hair instead, such as afHairLongStraightSidepart? You can also do manual assignments in Blender, or at least delete the mismatched ones (the top piece has bones for Spine and Neck, for example, which will be pulling it down).
If I remember correctly, when working with .wso you will need to use a reference that already has all morphs. It may be cleaner to use the EA hair for this as well.
#7
27th Nov 2023 at 11:20 PM
27th Nov 2023 at 11:20 PM
Posts: 45
Oh my gosh, i was starting with the hardest thing to make?
I'll try again, and if something comes up ill come back.
Thanks to both of you Lifesavers! cc savers..? yeah!
I'll try again, and if something comes up ill come back.
Thanks to both of you
#8
27th Nov 2023 at 11:24 PM
27th Nov 2023 at 11:24 PM
Posts: 484
Thanks: 10 in 2 Posts
I don't usually use GIMP but I just resaved the textures to fix the S3PE error, here are the export settings:
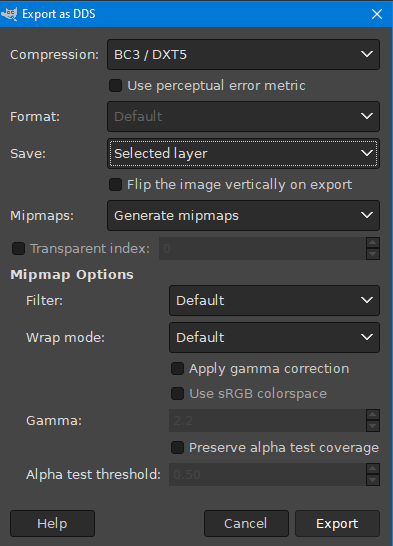
[Edit: "Selected Layer" can be changed to All Visible if you haven't flattened the image, I screenshot it before I switched it ]
]
Everything that isn't the multiplier/diffuse can be switched to DXT1.
And a heads up that the texture you labeled 'UV' is actually known as the 'mask' in TS3 terms
The UV are the mesh coordinates, like the screenshot LadySmoks provided showing where the mesh parts are taking their texture from.
The diffuse is looking good, but there's a lot of unused space, in the future you may want to move the pieces around to fully use up the square.
You're clearly skilled in meshing and baking textures already, it just takes a while to memorise all the TS3 specific steps. Good luck!
[Edit: "Selected Layer" can be changed to All Visible if you haven't flattened the image, I screenshot it before I switched it
 ]
]Everything that isn't the multiplier/diffuse can be switched to DXT1.
And a heads up that the texture you labeled 'UV' is actually known as the 'mask' in TS3 terms
The UV are the mesh coordinates, like the screenshot LadySmoks provided showing where the mesh parts are taking their texture from.
The diffuse is looking good, but there's a lot of unused space, in the future you may want to move the pieces around to fully use up the square.
You're clearly skilled in meshing and baking textures already, it just takes a while to memorise all the TS3 specific steps. Good luck!
#9
28th Nov 2023 at 12:07 AM
28th Nov 2023 at 12:07 AM
Posts: 865
Quote: Originally posted by Karuttiae
|
Oh my gosh, i've been trying to make it work for (not kidding) 3 straight days. This is the first time seeing the mesh work! :D I didn't compress my textures... how do i do that? (i use gimp/ clip studio art) How do i fix the headdress sinking? It looks fine in marvelous designer (the avatar is the same as sims' 3) And i didn't assign any bones(along with morph), i also dunno how to do that, i tried using mesh toolkit (auto tools for WSO) by selecting the 0 / 1 group and referencing it with the group 0 / 1 of the hijab cc, i tried with a preg morph as the reference...yeah again, im very very much a beginner.. and using tutorials from 6 years that don't really explain anything don't help Heres the UVs/multipliers i made: https://www.mediafire.com/file/h6ji...iplier.rar/file And here is the preg morph and the hijab cc's groups i used just in case: https://www.mediafire.com/file/ljd1..._morph.rar/file |
Although some swear by it, Marvelous Designer is possibly the worst program for making TS3 garments! It is a topology program for simulated dress making, which does a great job of creating a nice mesh, with crazy faces which do not support TS3 bones very well. Looking closer, it looks as you perhaps used decimate to reduce poly count? The inner and outer parts of the meshes have different face layouts. That can happen when reducing a mesh with inside and outside. Edges are not split and opened, so inner and outer become one piece. A tough one. So, to deal with the cards dealt!
I imported your multiplier to GIMP. Yup... 2048 uncompressed. Use Image> Scale Image, and set it to 1024 x 1024. On export, you will see a pop up window. Set compression to DXT5 and select to generate mipmaps.
In Blender, import your meshes. Then in the edit window, click where the arrow shows and import your multiplier.
In mesh edit mode, you see your UV. Move and resize the parts to fit the texture. I had to use UV> Mirror X for one of the halves.
Honestly, splitting inner and outer is more than I have time for right now, but it can be done... unless you have the original mesh that you burned the multiplier from? You should, which would be easier for you to start over with that mesh.
I will stop here, as if you have all of the original parts, it would bbe MUCH easier to start over than to fix the current.
Shiny, happy people make me puke!
#10
28th Nov 2023 at 12:09 AM
28th Nov 2023 at 12:09 AM
Posts: 865
Quote: Originally posted by Karuttiae
|
Oh my gosh, i was starting with the hardest thing to make? I'll try again, and if something comes up ill come back. Thanks to both of you |
Looks like @CardinalSims types faster than I!
But, hats aren't that hard! Hair guy just trying to make it seem that way!!!
And never import mips! They just clutter things. Easier to generate new ones on export.
Shiny, happy people make me puke!
#11
28th Nov 2023 at 12:18 AM
28th Nov 2023 at 12:18 AM
Posts: 865
Oh, and yes, I think that long straight side part hair might work for this mesh, for both bones and morphs. The next step would be a hair/ body combination .wso made using franken mesh in Meshing Tool Kit.
Shiny, happy people make me puke!
Shiny, happy people make me puke!
#12
28th Nov 2023 at 12:40 AM
28th Nov 2023 at 12:40 AM
Posts: 484
Thanks: 10 in 2 Posts
I do have a bit of a personal vendetta against hat-hair, given that I've reverse-engineered all of their resources while trying to make default replacements for them and I still have so many missing links for how to perfectly replicate them without TSRW 
On surface level yes, they're only a little more advanced. Under the hood... every CC hair is a nightmare on my eyes in S3PE. Even if they work fine ingame, I guess it's kind of like a programmer looking at spaghetti code. It may work, but it haunts my nightmares.
There are also no written tutorials on them! At least not here or hosted/linked in accessible places. It's a bit of a blind spot as far as good documentation goes.
I do not mean to scare away beginners from working on them, it's definitely fine using the older methods. Just when there is quirkiness to working on them, I am not surprised at all. They are a little quirky by design
#13
28th Nov 2023 at 4:21 AM
28th Nov 2023 at 4:21 AM
Posts: 865
Quote: Originally posted by CardinalSims
|
I do have a bit of a personal vendetta against hat-hair, given that I've reverse-engineered all of their resources while trying to make default replacements for them and I still have so many missing links for how to perfectly replicate them without TSRW On surface level yes, they're only a little more advanced. Under the hood... every CC hair is a nightmare on my eyes in S3PE. Even if they work fine ingame, I guess it's kind of like a programmer looking at spaghetti code. It may work, but it haunts my nightmares. There are also no written tutorials on them! At least not here or hosted/linked in accessible places. It's a bit of a blind spot as far as good documentation goes. I do not mean to scare away beginners from working on them, it's definitely fine using the older methods. Just when there is quirkiness to working on them, I am not surprised at all. They are a little quirky by design
|
That's because you want to do it the "right" way. I've made several default replacements, both garments and HAIRS with TSRW, and no issues other than hair textures seem to grasp the originals on some EA NPCs. Any in game created NPCs, and they get what I made. ut, that was happening with MJ's replacement hairs also, and she uses s3oc. I have replaced almost all of the ITF hairs, including the ponytail with a stupid flower on top of the head and weird bangs!
Other ITF hairs, I did total replacement, using cc hairs. I just use S3OC to get instance IDs and type them in.
Shiny, happy people make me puke!
#14
28th Nov 2023 at 7:20 AM
28th Nov 2023 at 7:20 AM
Posts: 484
Thanks: 10 in 2 Posts
Quote: Originally posted by LadySmoks
| That's because you want to do it the "right" way. |
Indeed, but it's just personal preference of course. With writing tutorials especially, I hold myself to a specific standard of what I'd feel qualified to speak on and how much I actually understand it. I mod the game more than I play it at this point, so the fun for me is to keep going back and refining a method to be cleaner and easier to replicate every time.
I really like that hair you made! I've always loved the original but it definitely lacked practicality.
I already have an entire set of base game hair replacers made, in which I squashed all of the issues that other replacers have, but the perfectionism is still a large reason why I haven't uploaded it. It's honestly just bone assignments giving me grief now- they aren't any worse than EA hairs, but EA's standards are apparently lower than mine. For now, I just play with them in my own save so that I can get a good extended playtest on the full set.
Once, after a long night of checking bones ingame and stressing over the deformities, I saw this EA Late Night hair do this:
At that point, it felt like the game was making fun of me for bothering
#15
28th Nov 2023 at 2:21 PM
28th Nov 2023 at 2:21 PM
Posts: 865
Quote: Originally posted by CardinalSims
|
Indeed, but it's just personal preference of course. With writing tutorials especially, I hold myself to a specific standard of what I'd feel qualified to speak on and how much I actually understand it. I mod the game more than I play it at this point, so the fun for me is to keep going back and refining a method to be cleaner and easier to replicate every time. I really like that hair you made! I've always loved the original but it definitely lacked practicality. I already have an entire set of base game hair replacers made, in which I squashed all of the issues that other replacers have, but the perfectionism is still a large reason why I haven't uploaded it. It's honestly just bone assignments giving me grief now- they aren't any worse than EA hairs, but EA's standards are apparently lower than mine. For now, I just play with them in my own save so that I can get a good extended playtest on the full set. Once, after a long night of checking bones ingame and stressing over the deformities, I saw this EA Late Night hair do this: At that point, it felt like the game was making fun of me for bothering
|
To continue off the rails here... As always, we each work with familiar. You, s3oc, and I with TSRW. I have prolems using tools like Morph Maker, and using geom morphs, so MTK morphing to .wso and TSRW are just easier for me, and I have been doing things that way for a while. BUT, aside from doing hairs, we can give people with questions, 2 different perspectives on reaching the same goals.
Thanks. That hair came out pretty good. Not all work out like that... DELETE! A mess never to be seen by anyone but me!!!
I also "fixed" that ITF top, and lowered those front and back panels.Yea, I get the "perfectionism" stuff. Sometimes, it can be hard to just let it go and say, "I did the best I can"... only to learn something new and say, "I can do that better now". I tend to recycle and reuse pieces in new projects. Currently doing The Morrigan. Her top armor is recycled from something I started several years ago! At the time, I did not know how to open the side faces after solidifying. Now I do, and spent a bit of time just fixing my own UV. Pic here
But, me and hair is like the person complaining about 4 to 3 conversions. Just make the changes you want, and be happy someone made the original. Far too many hair creators base their work on mid pigtails. Few bones and no morphs... so long hair in front clips boobs, or sits ridiculously far from the chest. I often shorten the front and add breast bones. Or hair close to the face, and fat morph, or cheek morph clip... I will add cheek bones.
Without checking in Blender, I would say that LN hair does not have a neck bone. Head dome, head new, spine 2? I have added neck bones to hairs because of that kind of clipping.
Shiny, happy people make me puke!
#16
28th Nov 2023 at 4:29 PM
28th Nov 2023 at 4:29 PM
Posts: 45
Hey, how about feet meshes? I tried looking for them but i can't find any
#17
28th Nov 2023 at 7:02 PM
28th Nov 2023 at 7:02 PM
Posts: 865
Quote: Originally posted by Karuttiae
| Hey, how about feet meshes? I tried looking for them but i can't find any |
Naked feet are listed with shoes.
Shiny, happy people make me puke!
#18
28th Nov 2023 at 9:39 PM
28th Nov 2023 at 9:39 PM
Posts: 45
what if i wanna make my own mesh?
#19
28th Nov 2023 at 9:54 PM
28th Nov 2023 at 9:54 PM
Posts: 865
Quote: Originally posted by Karuttiae
| what if i wanna make my own mesh? |
There are tutorials for learning that. Quite a few on youtube. I generally do not create a mesh, so much as to modify EA meshes. Conversions are a different modifying. I usually only make small pieces as accents... buckles, studs, straps, spikes, buttons, laces, etc. Made a couple of shields, but that's just a circle in Blender.
I also recall seeing a start to finish hair tutorial several years ago, so that kind of thing is also out there.
Shiny, happy people make me puke!
#20
28th Nov 2023 at 10:51 PM
28th Nov 2023 at 10:51 PM
Posts: 45
ill search that up when i wanna make shoes
So, a problem, while testing out blender (so i can redo the hood) i was making a test shirt while following a tutorial, i edit this front part and the plane behind it isn't being edited too, like it should in the tut. Also, the simulation looks weird, its glitchy, theres this weird space..
The vid of the issue: https://streamable.com/j1l45s (9:11)
the tutorial i watched: https://www.youtube.com/watch?v=-f5...channel=PIXXO3D
#21
28th Nov 2023 at 11:52 PM
28th Nov 2023 at 11:52 PM
Posts: 484
Thanks: 10 in 2 Posts
At that point it's not TS3 specific and we dive into meshing in general, which of course varies wildly between programs and projects.
As I don't make clothes (yet... for TS4 eventually) I don't have specific insight on the process from scratch, but I do notice that you're using a significantly different version of Blender to the tutorial. Some pretty major workflow changes happen between versions, hotkeys change, the exact behaviour of certain tools is modified, etc- it is not unusual to install many versions of Blender to work on the different projects they are each suited for.
I would recommend either getting 2.9 in order to follow along the tutorial exactly, or looking for tutorials that match the most recent release.
#22
29th Nov 2023 at 3:02 AM
29th Nov 2023 at 3:02 AM
Posts: 865
Quote: Originally posted by Karuttiae
|
ill search that up when i wanna make shoes So, a problem, while testing out blender (so i can redo the hood) i was making a test shirt while following a tutorial, i edit this front part and the plane behind it isn't being edited too, like it should in the tut. Also, the simulation looks weird, its glitchy, theres this weird space.. The vid of the issue: https://streamable.com/j1l45s (9:11) the tutorial i watched: https://www.youtube.com/watch?v=-f5...channel=PIXXO3D |
I must be honest... You said you are a beginner, but you are skipping steps 1 thru 100. You may have luck with it, or a natural talent, but skipping the more basic steps usually does not end well. I cannot help you with this, since I do not make garments that way, and know nothing of the process. Like you, I watched a video once. Tried it. Didn't work for me. Walked away.
Shiny, happy people make me puke!
Who Posted
|
|